Welcome to the wonderful world of cross stitch!

Cross stitch is a popular and easy form of embroidery that is perfect for beginners and makes beautiful artwork. It is created with an X shaped stitch on an evenweave fabric (Aida is recommended for beginners and will be used in this tutorial) with embroidery floss.
Below you will find a beginner's instruction guide to learning this craft. Please note that there are varying ways to perform different cross stitch steps and those found below are simply my preference as a cross stitcher. Best of luck to you as you learn this new craft--I know you'll be great--and don't forget to relax and have fun!
______________________________________
Step One: Learning how to read the pattern grid
- Each square on the pattern grid represents one stitchable space on your fabric and one cross stitch.
- Every color of floss used in the pattern is represented by a unique symbol and should be used to fill that symbol's spaces on the fabric.
- Empty squares with no symbol are to be left unstitched.
- For your convenience, heavier lines are printed every 10 stitches.
IMPORTANT: To fit standard size paper for printing patterns may be split across two or more pages. The first two columns and/or rows on the second page are shaded because they are a repeat of the last two columns/rows on the first page. Do NOT restitch these. They are provided to help transition between pages.
Step Two: Preparing your materials
- If you purchased a kit, your fabric has already been cut to size. If you purchased your own fabric, cut it to the size indicated in the pattern.
- Some cross stitchers prefer to cut their fabric slightly larger for framing and finishing purposes.
- You may also wish to protect the edges from fraying while you work on your project by either folding masking tape over the edge or using fray check glue. Note that there are downsides to both of these options as masking tape has the ability to discolor the fabric and fray check has a strong toxic odor. I prefer to simply handle my fabric with care while I work and frame it immediately upon completion to keep it in the best, clean condition. If available, you can also use a serger machine to secure the edges.
- Once your fabric is cut, find the center by folding the fabric in half from top to bottom and gently creasing the folded edge, unfold and do the same folding left to right. Where the two lines meet is the center of your fabric.
- Don't press these fold too hard or they may be difficult to get out later. Simply pinch the fabric near to the center and it will hold the line long enough for you to determine where the center is.
- Use the provided arrows on your pattern to determine the center and pick out your first working floss color.
- Cut a piece of floss approximately 45 inches long. As you become more comfortable stitching, longer pieces of floss can be used.
- Notice that your cut piece of floss is made up of 6 smaller, individual strands of floss. Separate ONE strand and set the others aside.
- Fold the single strand in half and thread the needle with BOTH ends of the floss.
Step Three: Creating the X stitch
Look closely at your Aida fabric and you will see that it is made up of perfectly even rows and columns of little holes. If you focus on one hole you will see that when combined with those around it, little squares are created. It is in these squares that your cross stitches will be created.
- Begin by putting your needle with floss up through the back of your work where you wish to begin stitching.
- This will be the bottom left corner of your first stitch.
- Pull approximately 4 inches of thread through the fabric leaving the rest still dangling on the back side.
- Put the needle down through the top right corner of your stitch leaving your needle half way through the fabric.

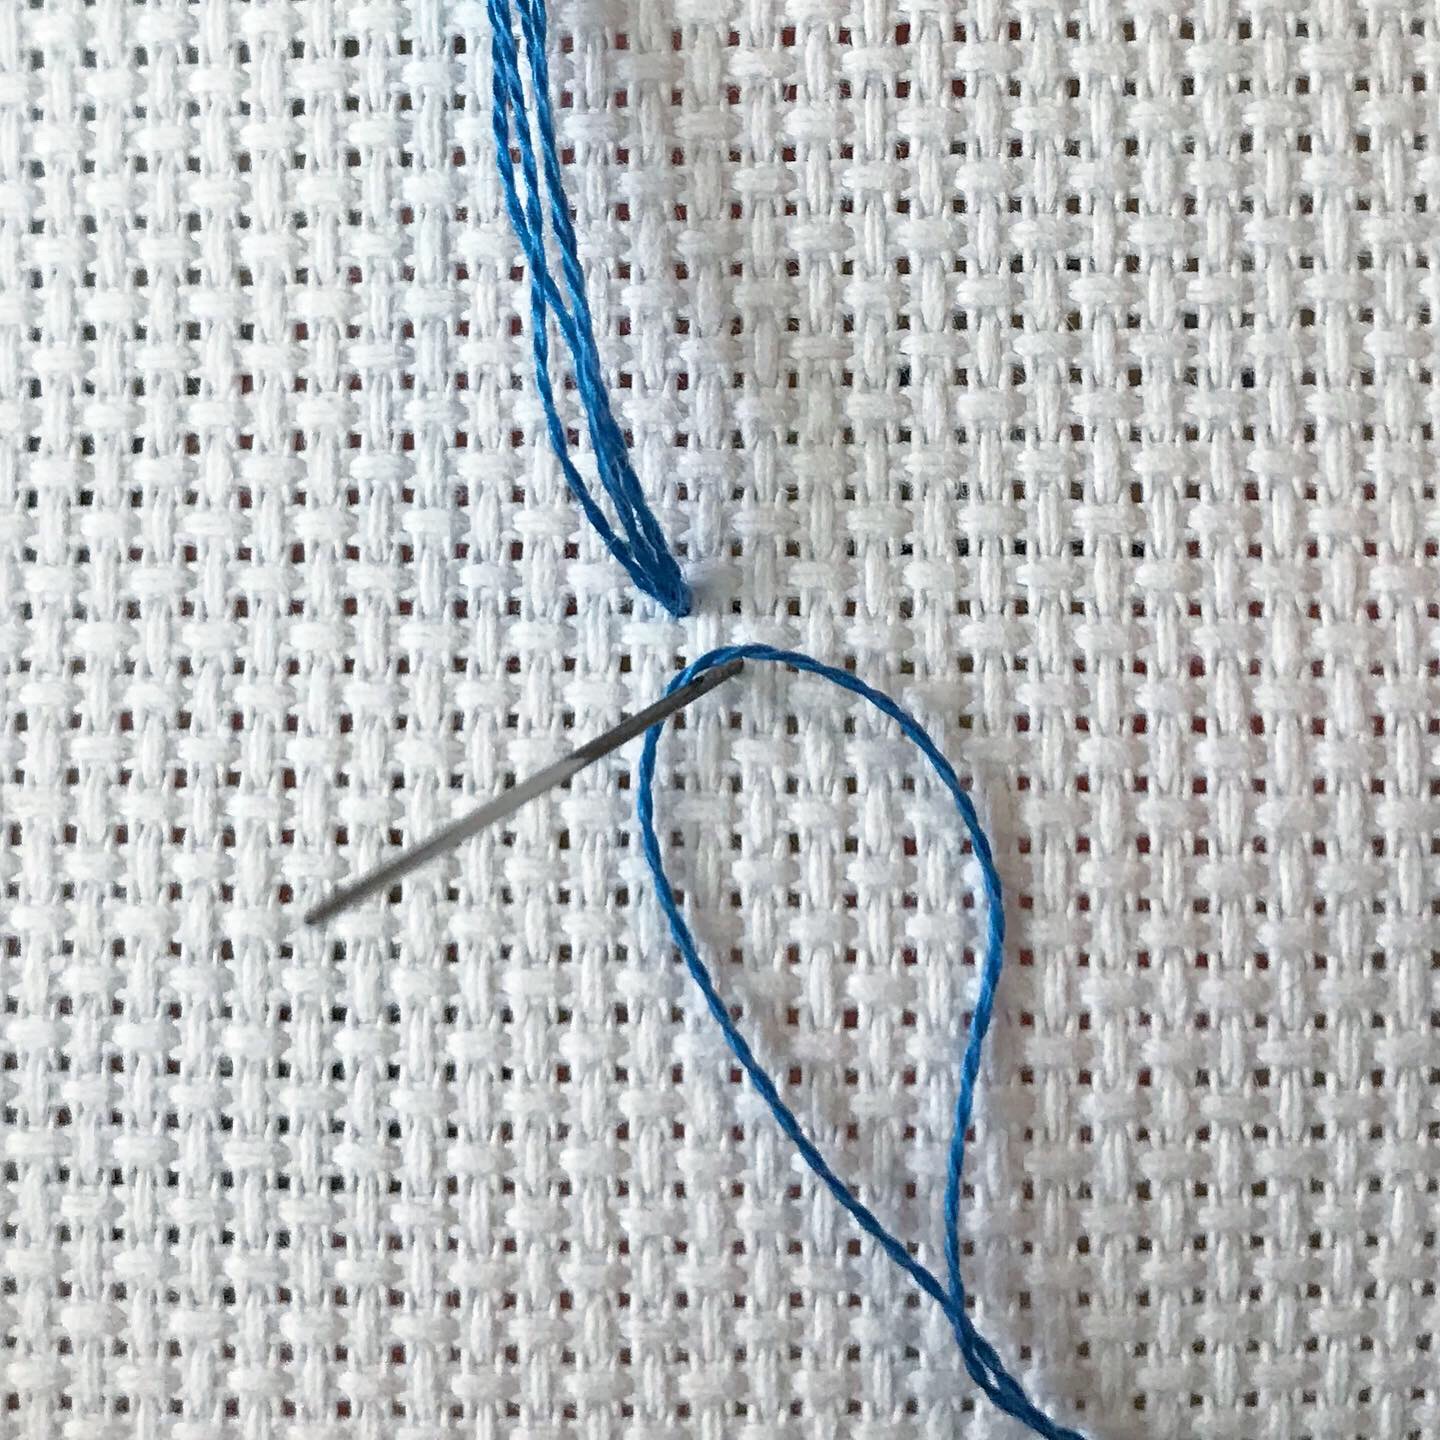
- Turn your work over so that you are viewing the back side and taking up the length of floss that remained on the back side, place the loop at its end over the needle.
- Pull the needle and floss through the loop until the floss is secured and then return to the front of your work.
- This is called loop start. It cannot be used when a pattern calls for one or three strands of floss for stitching. Because we folded a single strand of floss in half, loop start turns this single strand of floss into two stitchable strands.
- Be sure not to pull this first stitch, or any stitch, too tight. The loop will hold the floss in place without needing any tension put on it. Pulling too hard on any stitch will distort the fabric and make visible holes in your work.

- Finish your stitch by putting the needle up through the bottom right corner and down through the top left corner.


Step Four: Working a block of the same color
When multiple stitches of the same color are next to each other in a row, you will work them together as a group rather than as individual stitches. This is done by working only the first half of the X across the row and the second half of the X as you come back across the row.
- Start as you would with an individual stitch by putting the needle up through the bottom left and down through the top right.
- Continue by putting your needle up through the bottom right, but instead of finishing the stitch by going down through the top left of this first stitch, this will be the bottom left corner of the next stitch.
- Put the needle down through the top right corner of the second stitch and continue on this way until you have completed the row.

- Now work your way back across the row going up through the bottom right and down through the top left of each stitch.


You can also work in this same manner vertically for columns.


Step Five: Finishing a piece of floss
When you have finished working with a piece of floss, simply secure it in place by running it through the back side of several stitches. Clip the floss short so that it does not tangle with other floss while you work.


Tips and Tricks:
- Stitch all stitches in the same direction to create a uniform look.
- When working with a color that has stitches near, but not next to each other, it is okay to skip over a few stitches to work with the same strand of floss. Avoid skipping over large areas or what will remain unstitched spaces with a dark color of floss, as it may be seen through the fabric.
- If you begin getting lots of knots, your floss is probably twisted. To avoid this, frequently hold your work in the air and let the floss and needle dangle freely (known as "dropping your needle"). The weight of the needle will untwist the floss.
- Hoops are a great help when cross stitching but will leave rings in the fabric that are difficult to get out. If working with a hoop, always take it off when you are not stitching.
- Cross stitch should only ever be hand washed with a delicate soap like Dawn.
- If using floss other than DMC, colors may run when wet.
No comments:
Post a Comment